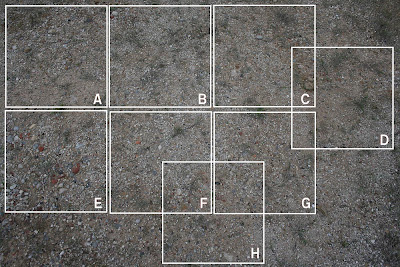
We now need to select 8 different areas of this image and make 8 different textures. You can pick any areas you think are suitable, Below is how I picked.

In the toolbox on the left click on the retangle selection tool and draw a box on your image.
We need that image to be 256/256 exactly so type in 256 in the selection box in the lower part of the toolbox. This will need to be done 8 times from the source image.
For each one click Edit/Copy from the top tool bar, then click on File/new on top tool bar.
Type in 256 in the Width and height boxes and click ok.
This opens up a new image. (with it's own top tool bar) Click on the new top tool bar and click Edit/Paste.
Click on File/Save as and type in Sm_Stones01_A Click on the flatten layers and click save.
Do this for all 8 textures, name each one as described in Part 1.
Sm_Stones01_A
Sm_Stones01_B
Sm_Stones01_C
Sm_Stones01_D
Sm_Stones01_E
Sm_Stones01_F
Sm_Stones01_G
Sm_Stones01_H
Once all of that is done close all the images down and open up the REd, Green, Blue and Yellow textures.
Also open up Sm_Stones01_A.
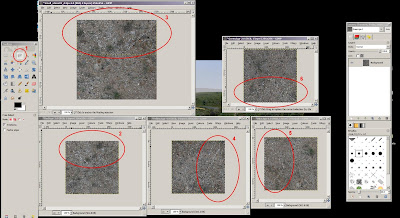
As seen in this image, we need red at the top, green at the bottom, blue on the left and yellow on the right.
Select the free select tool (1) and on the red.tga file left click and draw a triangle around the top section (2)

Click Edit/Copy from the top tool bar, then on the Sm_Stone01_A texture click Edit Paste as/New Layer. Align your new layer to the top edge. (3)
Make sure Snap is on so that your layer is snapped to the edge correctly. (View/Snap to Canvas Edges.)
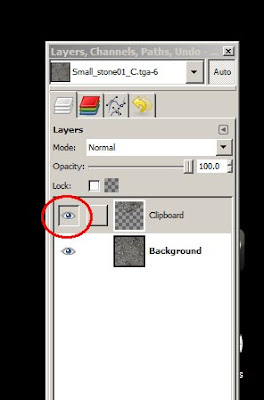
Now click on the Red Eraser tool, select a circle fuzzy brush about size 15 and dab around edges of new selection so that you blend it in with the image below. You can toggle the layer on and off by clicking on the eye icon in the layers window (see image below)

Follow the above steps for the yellow/Green and blue layers, each time make sure you are happy with the result, you can always delete a layer and redo if not happy.
Once complete you now need to merge layers (you can save as a layered image but I tend not to bother on images that only take a few minutes ot make)
To merge the layers, click on Layer/Merge down on the top tool bar, do this for all layers.
Ok, almost there.
Now we need to make a alpha channel for the texture, (I am still unhappy about this process in Gimp and sure there is a better way)
On Sm_Stone_A top tool bar click on Edit/Copy, then Edit paste as/New layer, then click on Layer/Mask/Add Layer Mask on top tool bar. In the new pop up window click on Grayscale copy of layer, then click Add.
Over in the Layers window click off the background image
and leave just your new layer with a grayscale version which will get saved as your alpha channel.

Click on File/Save as keep the same name, confirm you will be replacing it and that you are saving a layered iamge as a TGA, Click on Merge layers and then click ok (lots to confirm! :) )
Repeat that process for each of your 8 textures, making sure you match the edges to the image seen here you will have a set of textures ready to be converted into Ace files, Well done!
First time round the process takes awhile, however after a few atempts it should take about 15 minutes per texture set.
Next in Part 4: Coverting to Ace using Ben Laws Ace tool and setting up Terrain XML.
regards
derek
Very good tutorial, thanks!
ReplyDelete