New Version now for download on our website under art plugins:
http://www.railsimulator.com/support.php
Fixed mipping problems on terrain textures. (thank you Ben!)
cheers
Derek
Thursday, 17 June 2010
Wednesday, 16 June 2010
WANG: PART 7
The cool thing about the terrain system is you can specify a different texture per season.
Also you don't have to make seasonal variations of each texture, you can just reference what you hvae in your list.
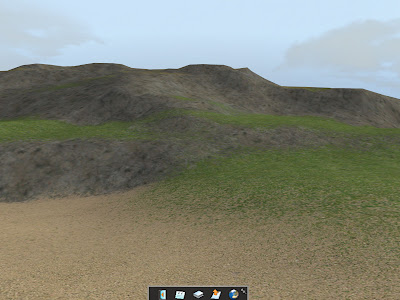
So, in my little test route using the same methods in earlier posts I made a Snow, Mud and meadow texture sets. I then referenced them on the season slots for mix map 1.
So, where every the grass is sprayed, in spring there will be a meadow, Autumn there will be mud and in winter there will be snow.
A good example of this in RWs is where we have a ploughed field in Spring, Cornfield in Summer, mud in Autumn with snow in winter. This really does help give your routes a different feel when driving in the different seasons. (Of course if you have a procedural grass texture you must take into account the changes and make season variations of the grass. (look out for further posts))
Spring
Summer
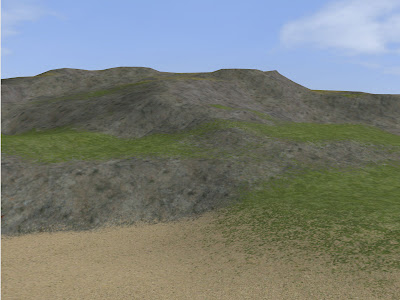
Autumn
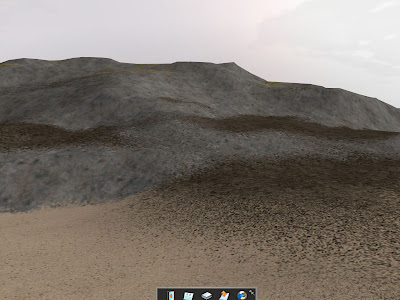
Winter
Also you don't have to make seasonal variations of each texture, you can just reference what you hvae in your list.
So, in my little test route using the same methods in earlier posts I made a Snow, Mud and meadow texture sets. I then referenced them on the season slots for mix map 1.
So, where every the grass is sprayed, in spring there will be a meadow, Autumn there will be mud and in winter there will be snow.
A good example of this in RWs is where we have a ploughed field in Spring, Cornfield in Summer, mud in Autumn with snow in winter. This really does help give your routes a different feel when driving in the different seasons. (Of course if you have a procedural grass texture you must take into account the changes and make season variations of the grass. (look out for further posts))

Spring

Summer

Autumn

Winter

Regards
Derek
Tuesday, 15 June 2010
WANG: PART 6
Ok, we are nearly there so hang on in there.
Load up RailWorks and Start the game.
Click on Routes, then New Routes.
Choose a template, for now just pick Default, (but the choice is yours) Click Create and give your Route a name, I called mine Bishop. Click ok and an empty route will load up with the default textures.
Close RailWorks.
Navigate to your Route folder. (something like: C:\Program Files (x86)\Steam\steamapps\common\railworks\Content\Routes )
Organise the folder by date, your new route will be at the top, I rename my route folders so I know which one is which. I added BISH in the second set of digits.
Inside that folder is a RouteProperties.xml
We are going to edit this file using Notepadd++ and reference our new terrain xml.
PLease note the correct way to do this is to set up your own Route template that is discussed on the WIKI
Ok, now that I am breaking all my own rules, please Note... Take care editing any xml in Notepadd++
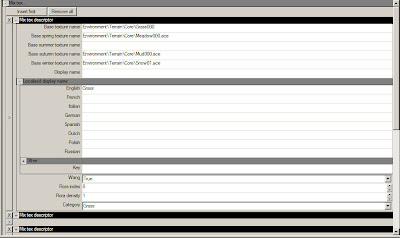
1. Open the RouteProperties.xml in a text editor such as Notepad++
2. Browse to the following. I have highlighted the important bits in RED:

3. Change the parts highlighted in red to match the location (including product and provider) of the exported texturing file you have created.
4. Save the RouteProperties.xml then run RailWorks and load the route. Your new terrain textures should now be available.
5. If your new texturing file is in a provider/product which is not preloaded, you should tick it in the object set filters for that route so that it is preloaded next time.


Load up RailWorks and Start the game.
Click on Routes, then New Routes.
Choose a template, for now just pick Default, (but the choice is yours) Click Create and give your Route a name, I called mine Bishop. Click ok and an empty route will load up with the default textures.
Close RailWorks.
Navigate to your Route folder. (something like: C:\Program Files (x86)\Steam\steamapps\common\railworks\Content\Routes )
Organise the folder by date, your new route will be at the top, I rename my route folders so I know which one is which. I added BISH in the second set of digits.
Inside that folder is a RouteProperties.xml
We are going to edit this file using Notepadd++ and reference our new terrain xml.
PLease note the correct way to do this is to set up your own Route template that is discussed on the WIKI
Ok, now that I am breaking all my own rules, please Note... Take care editing any xml in Notepadd++
1. Open the RouteProperties.xml in a text editor such as Notepad++
2. Browse to the following. I have highlighted the important bits in RED:
(Click on image below for higher res image)

3. Change the parts highlighted in red to match the location (including product and provider) of the exported texturing file you have created.
4. Save the RouteProperties.xml then run RailWorks and load the route. Your new terrain textures should now be available.
5. If your new texturing file is in a provider/product which is not preloaded, you should tick it in the object set filters for that route so that it is preloaded next time.
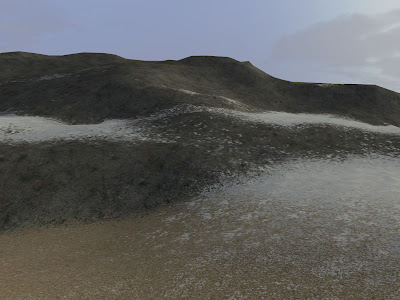
So this is where the fun started.
With Ben's RW Ace tool it worked great but I had an issue with the last mip. I have emailed Ben to see if he can improve the situation. Will keep users posted.

So I reverted back to the trusty ToAce by Paul Guasden, only to find out the problems of using the 64 bit system. I'm sure there is a work-a-round for this but at midnight and no tech help I just left it alone.
Time to boot up the trusty xp machine to convert the tga files.
And here is the result. Not the smooth ending I wanted but got there thanks to Ben and Paul's tools.
Note that no spraying/painting was used on the below image, all of that was because of the values we put in the xml.

By going through this process I certainly have felt users pain if they do not have photoshop.
All noted for sure.
So thats the end of Wang, next up procedural grass.
regards
Derek
WANG: PART 5
Before we start the next chapter it is wise to make a further 3 sets of textures.
1 - Grass. This will be your mid ground cover and the texture you see when you first load up the route. (assuming you are just above sea level, these values can be changed and will be explained)
2 - Sand. This I am using for the ground below sea level.
3 - Dry grass. This I am using for my upper ground.
4 - Small stones. (made in part 2) This we are using as our Rock gradient.
Adam explained it when we made Phorum a few months back, for reference Here is his post.
So, lets make our new terrain xml.
In your source folder, located somewhere like this (depending on where you have the game saved)
C:\Program Files (x86)\Steam\steamapps\common\railworks\Source
Make a Provider/Product folder set up so it looks like this:
C:\Program Files (x86)\Steam\steamapps\common\railworks\Source\RSderek\Bishop\Environment\Terrain
RSderek the provider and Bishop is the poduct.
Within that Bishop Folder make an Environment folder then a Terrain Folder.
Within that Terrain folder you can make other folders to seperate out your various textures so that they are easy to find, Grass, Rock, sand, urban, etc etc.
To begin with I made a folder called Core. Here I copied the 4 main textures needed to set up the route. (You don't need to set up 4, you can ref the same texture for all sections but a bit pointless as you would not see anything... :) )
Now the fun begins. Load up RWs and start the Blueprint editor.
Navigate to your Terrain folder and right click the folder, then select new Blueprint.
Scroll down the list to Terrain Texture blueprint, select it then click ok.
Rename the xml, I named mine Terrainset.
Below is an example of my basic parameters, set your something like it, looking back to Adams post for more refference.
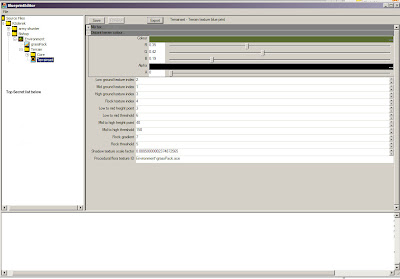
For now leave the Procedural flora texture ID blank. (We (you) have not made that yet, this will be covered in a 'Wang epilog' post)
Click Save
Ok, Now to add your Textures to the xml.
Click on the little plus symbol at the top next to the work Mix tex.
This expands the texture area. Right click the texture in the core folder and select copy file name.
In the base texture name slot press Cntrl V to paste the string.
IMPORTANT: remember to remove the _A (it is not needed here)
Fill in the rest of the details like the image below.
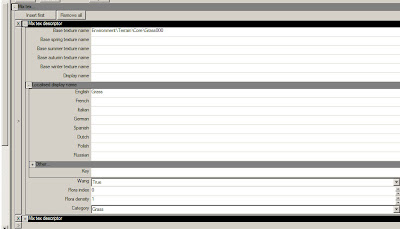
Click Save.
Click on the little > icon, this will open up another texture slot, it will need to be filled in as the first. (Make sure you match the correct texture to the ID number given in the low/mid/high texture index.)
Note also that this is the order that the textures will appear in your texture list in game.
When all done click save, then export.
Next in Part 6 Referencing your terrain xml to in your new route.
Monday, 14 June 2010
WANG: PART 4
Just a mini update this morning,
To make an Ace file without photoshop or ACDsee you will need Ben Laws excellent RWAce Tool located on our Website: http://www.railsimulator.com/en/support. under the Railworks art plugins heading.
Once downloaded, follow the install instructions and run the RWAceTool.exe
Click on the single image conversion first, browse for your textures and pick the first _A and click open. Then click view.
Here you can look at RGB texture or the alpha. Close the image down and click back.
Click on the Multiple image conversion.
Click the Add button on the right, then select your 8 textures, then open.
Click the Next button, then the Start button. The process will take a second. Once done click the finish button.
And there you have it your set of Ace files.
Next in Part 5, How to set up your new terrain xml.
Then, in the final Part (6) we will cover how to refference your new terrain xml in your route.
d
Sunday, 13 June 2010
WANG: PART 3
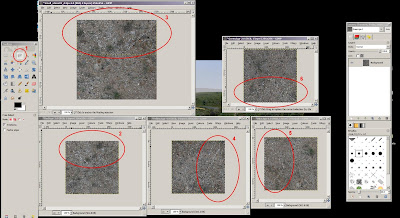
Open up Stone_Source01.tga that you saved from PART 2.
We now need to select 8 different areas of this image and make 8 different textures. You can pick any areas you think are suitable, Below is how I picked.
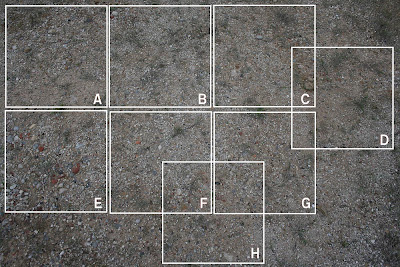
In the toolbox on the left click on the retangle selection tool and draw a box on your image.
We need that image to be 256/256 exactly so type in 256 in the selection box in the lower part of the toolbox. This will need to be done 8 times from the source image.
For each one click Edit/Copy from the top tool bar, then click on File/new on top tool bar.
Type in 256 in the Width and height boxes and click ok.
This opens up a new image. (with it's own top tool bar) Click on the new top tool bar and click Edit/Paste.
Click on File/Save as and type in Sm_Stones01_A Click on the flatten layers and click save.
Do this for all 8 textures, name each one as described in Part 1.
Sm_Stones01_A
Sm_Stones01_B
Sm_Stones01_C
Sm_Stones01_D
Sm_Stones01_E
Sm_Stones01_F
Sm_Stones01_G
Sm_Stones01_H
Once all of that is done close all the images down and open up the REd, Green, Blue and Yellow textures.
Also open up Sm_Stones01_A.
As seen in this image, we need red at the top, green at the bottom, blue on the left and yellow on the right.
Select the free select tool (1) and on the red.tga file left click and draw a triangle around the top section (2)
Click Edit/Copy from the top tool bar, then on the Sm_Stone01_A texture click Edit Paste as/New Layer. Align your new layer to the top edge. (3)
Make sure Snap is on so that your layer is snapped to the edge correctly. (View/Snap to Canvas Edges.)
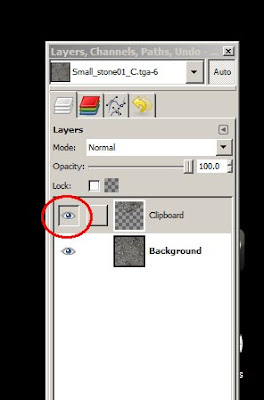
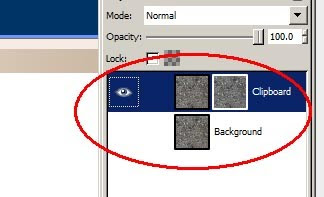
Now click on the Red Eraser tool, select a circle fuzzy brush about size 15 and dab around edges of new selection so that you blend it in with the image below. You can toggle the layer on and off by clicking on the eye icon in the layers window (see image below)
Follow the above steps for the yellow/Green and blue layers, each time make sure you are happy with the result, you can always delete a layer and redo if not happy.
Once complete you now need to merge layers (you can save as a layered image but I tend not to bother on images that only take a few minutes ot make)
To merge the layers, click on Layer/Merge down on the top tool bar, do this for all layers.
Ok, almost there.
Now we need to make a alpha channel for the texture, (I am still unhappy about this process in Gimp and sure there is a better way)
On Sm_Stone_A top tool bar click on Edit/Copy, then Edit paste as/New layer, then click on Layer/Mask/Add Layer Mask on top tool bar. In the new pop up window click on Grayscale copy of layer, then click Add.
Over in the Layers window click off the background image
and leave just your new layer with a grayscale version which will get saved as your alpha channel.
Click on File/Save as keep the same name, confirm you will be replacing it and that you are saving a layered iamge as a TGA, Click on Merge layers and then click ok (lots to confirm! :) )
Repeat that process for each of your 8 textures, making sure you match the edges to the image seen here you will have a set of textures ready to be converted into Ace files, Well done!
First time round the process takes awhile, however after a few atempts it should take about 15 minutes per texture set.
Next in Part 4: Coverting to Ace using Ben Laws Ace tool and setting up Terrain XML.
regards
derek
We now need to select 8 different areas of this image and make 8 different textures. You can pick any areas you think are suitable, Below is how I picked.

In the toolbox on the left click on the retangle selection tool and draw a box on your image.
We need that image to be 256/256 exactly so type in 256 in the selection box in the lower part of the toolbox. This will need to be done 8 times from the source image.
For each one click Edit/Copy from the top tool bar, then click on File/new on top tool bar.
Type in 256 in the Width and height boxes and click ok.
This opens up a new image. (with it's own top tool bar) Click on the new top tool bar and click Edit/Paste.
Click on File/Save as and type in Sm_Stones01_A Click on the flatten layers and click save.
Do this for all 8 textures, name each one as described in Part 1.
Sm_Stones01_A
Sm_Stones01_B
Sm_Stones01_C
Sm_Stones01_D
Sm_Stones01_E
Sm_Stones01_F
Sm_Stones01_G
Sm_Stones01_H
Once all of that is done close all the images down and open up the REd, Green, Blue and Yellow textures.
Also open up Sm_Stones01_A.
As seen in this image, we need red at the top, green at the bottom, blue on the left and yellow on the right.
Select the free select tool (1) and on the red.tga file left click and draw a triangle around the top section (2)

Click Edit/Copy from the top tool bar, then on the Sm_Stone01_A texture click Edit Paste as/New Layer. Align your new layer to the top edge. (3)
Make sure Snap is on so that your layer is snapped to the edge correctly. (View/Snap to Canvas Edges.)
Now click on the Red Eraser tool, select a circle fuzzy brush about size 15 and dab around edges of new selection so that you blend it in with the image below. You can toggle the layer on and off by clicking on the eye icon in the layers window (see image below)

Follow the above steps for the yellow/Green and blue layers, each time make sure you are happy with the result, you can always delete a layer and redo if not happy.
Once complete you now need to merge layers (you can save as a layered image but I tend not to bother on images that only take a few minutes ot make)
To merge the layers, click on Layer/Merge down on the top tool bar, do this for all layers.
Ok, almost there.
Now we need to make a alpha channel for the texture, (I am still unhappy about this process in Gimp and sure there is a better way)
On Sm_Stone_A top tool bar click on Edit/Copy, then Edit paste as/New layer, then click on Layer/Mask/Add Layer Mask on top tool bar. In the new pop up window click on Grayscale copy of layer, then click Add.
Over in the Layers window click off the background image
and leave just your new layer with a grayscale version which will get saved as your alpha channel.

Click on File/Save as keep the same name, confirm you will be replacing it and that you are saving a layered iamge as a TGA, Click on Merge layers and then click ok (lots to confirm! :) )
Repeat that process for each of your 8 textures, making sure you match the edges to the image seen here you will have a set of textures ready to be converted into Ace files, Well done!
First time round the process takes awhile, however after a few atempts it should take about 15 minutes per texture set.
Next in Part 4: Coverting to Ace using Ben Laws Ace tool and setting up Terrain XML.
regards
derek
Saturday, 12 June 2010
WANG: PART 2
Now that we have the basics we need a suitable image to make the textures from.
When I go out and gather my reference pictures I usually take a number of photos of the same area so that I can get variation, however one high res image will usually do.
I have gathered a number of suitable textures already and they are freely available from my flickr site:
http://www.flickr.com/photos/46897232@N04/
I will be using the small stone floor texture. (see link below)
http://www.flickr.com/photos/46897232@N04/4571961761/sizes/o/
Save this image in a folder on your local drive.
I often make a workspace folder for each terrain texture so that the source files and finished ACE files are kept together till I am finished and they are ready to go in game.
For this I will not be using photoshop but will be using Gimp which is free to download, a quick internet search will find it.
Load up Gimp and open the photo you just saved. Our textures need to be 256/256 pixels in size and at the current resolution the image is not right.
Scale photo
In the tool bar click on Image and then scale image, in the new window reduce image size to 1000 pixels in width and 667 pixels in height, then click the scale button.
Your iamge will shrink on screen too, however you can use the magnifying glass to zoom in which is in the tools window on the left. As you can seen the image is not as crisp as it once was.
Sharpen Image
In the top tool bar click on Filter/Enhance/Sharpen
Move the slider till it is between 30 or 40 and click ok.
Safe image as a TGA file
On the top tool bar click File/Save as and type in Stone_Source01.tga
Another small window pops up about BLE compression, just click the save button without changing any settings.
creating your red,blue,green and yellow source textures
In the toolbox on the left click on the retangle selection tool and draw a box on your image.
We need that image to be 256/256 exactly so type in 256 in the selection box in the lower part of the toolbox.
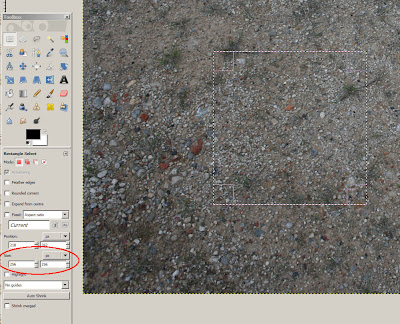
Now move your selection box around the texture till you have an area that is suitable.
Please note that the aim is to have a texture that is detailed but lacks any large features that would show up once tiled.
Once you have found a suitable area click on Edit/Copy from the top tool bar, then click on File/new on top tool bar.
Type in 256 in the Width and height boxes and click ok.
This opens up a new image. (with it's own top tool bar) Click on the new top tool bar and click Edit/Paste.
Click on File/Save as and type in Red.tga Click on the flatten layers and click save.
Making the texture Tile
We now have an image that needs to tile to work.
Click on Layer/Transform/Offset from the top tool bar, type in 128 in the x and y boxes then click offset.
Now you have a texture that has the edges crossing in the middle of the texure. The good news is your texure will now tile along it's edges. We just need to remove the straight edges from the middle.
Clone brush
The clone brush is a wonderful tool that allows you to select an area of an image and paint it other another area.
Click on the clone tool (see image), select a fuzzy brush and make sure your brush is not to big or small, (15 pixels is about right)
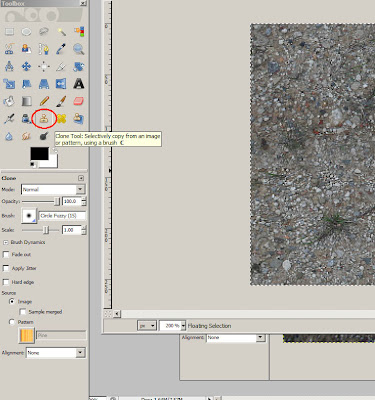
Hold Ctrl down and select an area on your texture. This layers a marker where you will start your clone. Then paint over an area where you can see the square edge.
After you have painted a few details out, hold Ctrl down again and select another area of your texure and paint another straigh edge out. This keeps the area looking natural and random.
Do this till you can not see any straight lines, Click Save.

You now have one of your 4 textures, do the same for Green/yellow and blue textures.
For each one pick a new 256/256 area from your source texture.
While it may feel a little long winded, once you have got upto speed each image should only take a minute or so to make.
Next in PART 3: creating the final 8 textures.
Friday, 11 June 2010
WANG: PART 1
Creating your own terrain texture set is the best way to make your route stand out from the crowd. It also allows you to order and control how you group your textures.
What is Wang?
Wang tiles are sets of textures that fit together to non-periodically tile across the terrain,
creating expanses of non repeating texture and avoiding the 'carpet' effect.


What is Wang?
Wang tiles are sets of textures that fit together to non-periodically tile across the terrain,
creating expanses of non repeating texture and avoiding the 'carpet' effect.
More info can be obtained by a very quick internet search. I have also seen applications that make the wang textures, however I have to say that I never seemed to get the results I wanted.
Making them by hand can be time consuming but like all things the more you make the easier it gets.
So, lets look at the basics before we get into the details.
Making them by hand can be time consuming but like all things the more you make the easier it gets.
So, lets look at the basics before we get into the details.
Railworks uses 8 wang tiles to create a terrain texture and like everything in RWs they need to be named correctly.
For Example:
Grass01_A
Grass01_B
Grass01_C
Grass01_D
Grass01_E
Grass01_F
Grass01_G
Grass01_H
These textures need to be 32 bit which means they need an alpha channel. The Alpha channel is used for the blending between different texture sets.
How do we get the textures to tile in a set?
The 8 textures in a set get tiled in a certain way. This can be best explained by using a colour diagram.
(see image below)

So, using this method I would make 4 key tileable 256/256 textures.
I name them; Red, Blue, Yellow and Green. This helps me keep track of what I am doing.
From these 4 textures (which each need to be tileable with itself) you can make the 8 you need.
So, to make texture A you would copy the top from red texture and place it at the top, right side from the yellow, blue from the left and green from the bottom. (see image below)
Texture_A

Texture_B


Texture_C

Next up in Part 2, picking the right image to get your textures from and getting the scale correct for ingame. (you don't want pebbles the size of footballs).

Next up in Part 2, picking the right image to get your textures from and getting the scale correct for ingame. (you don't want pebbles the size of footballs).
Subscribe to:
Posts (Atom)