 |
| Anyone want to know about TrainEmissiveGlow.fx? |
Monday, 23 April 2012

Monday, 9 April 2012
TrainLightBumpSpecMask
I have seen a few people confused on new shaders, also seen one person post up how it does not work when it is clear he has his material set up wrong.
So, here I am to teach those who want to get their learn on.
TrainLightBumpSpecMask
Use this shader on scenery objects that require normal maps, specular maps and ambient occlusion maps.
Ambient occlusion
In basic terms, when creating these assets, think of an ambient occlusion map as a shadow-map. Light areas of the map are unaffected and dark areas of the map represent the shadowy areas (under gutters or in crevices).
The Shader
Use this shader on foreground buildings. Group assets that are built specifically for use as a background object should not use this material.
Slot 1 is the diffuse texture. (1st mapping channel)
Slot 2 is the normal map (24bit) with specular map (8bit) in the alpha channel. (1st mapping channel)
Slot 3 is the Ambient Occlusion map. (second map channel (shadow/lightbake))
Generally, make slot 1 and slot 2 share the same UV channel 1, and the Ambient Occlusion map have a second UV mapping channel 2. This allows for the same flexibility as when using the old shadow-map technique on the old legacy assets.
Example
Trackside Buildings
One thing to understand about this material and Trainlightmap with Diffuse, surfaces that point upwards the shadow bake gets washed out by the sun because it is a light.
If the same shadow/light map was applied to a vertical surface in stead of a horizontal one the shadow is more pronounced. (see image 3)
Shining a torch in a shadowed baked area now gets lit up, you would not expect to see a soft shadow that was generated from a global light would you?
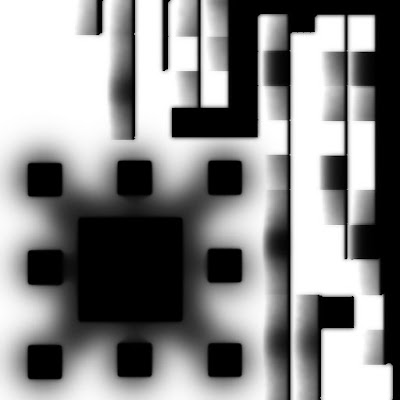
Example of the occlusion map.
Once you have your materials set up correctly you can see how it looks.


 This is a great shader to use on stations or any other track side buildings. Buildings away from the track really do not need this material.
regards
Derek
Thursday, 17 June 2010
RW Ace tool
New Version now for download on our website under art plugins:
http://www.railsimulator.com/support.php
Fixed mipping problems on terrain textures. (thank you Ben!)
cheers
Derek
http://www.railsimulator.com/support.php
Fixed mipping problems on terrain textures. (thank you Ben!)
cheers
Derek
Wednesday, 16 June 2010
WANG: PART 7
The cool thing about the terrain system is you can specify a different texture per season.
Also you don't have to make seasonal variations of each texture, you can just reference what you hvae in your list.
So, in my little test route using the same methods in earlier posts I made a Snow, Mud and meadow texture sets. I then referenced them on the season slots for mix map 1.
So, where every the grass is sprayed, in spring there will be a meadow, Autumn there will be mud and in winter there will be snow.
A good example of this in RWs is where we have a ploughed field in Spring, Cornfield in Summer, mud in Autumn with snow in winter. This really does help give your routes a different feel when driving in the different seasons. (Of course if you have a procedural grass texture you must take into account the changes and make season variations of the grass. (look out for further posts))
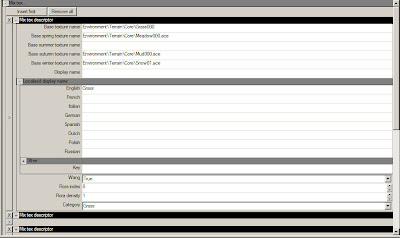
Spring
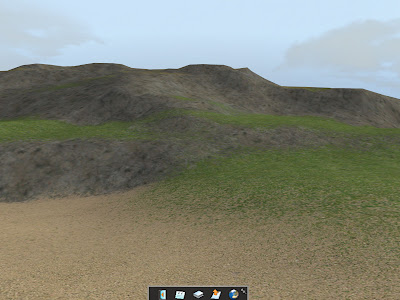
Summer
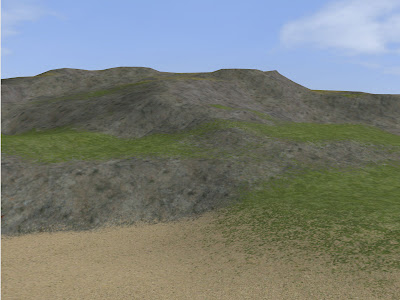
Autumn
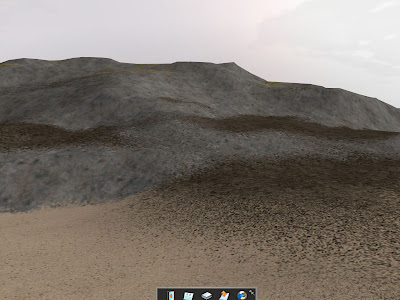
Winter
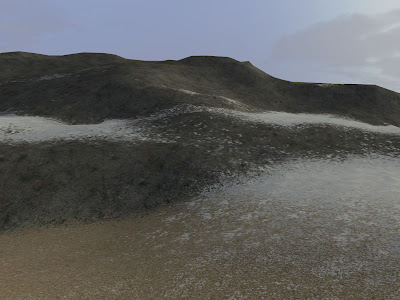
Also you don't have to make seasonal variations of each texture, you can just reference what you hvae in your list.
So, in my little test route using the same methods in earlier posts I made a Snow, Mud and meadow texture sets. I then referenced them on the season slots for mix map 1.
So, where every the grass is sprayed, in spring there will be a meadow, Autumn there will be mud and in winter there will be snow.
A good example of this in RWs is where we have a ploughed field in Spring, Cornfield in Summer, mud in Autumn with snow in winter. This really does help give your routes a different feel when driving in the different seasons. (Of course if you have a procedural grass texture you must take into account the changes and make season variations of the grass. (look out for further posts))

Spring

Summer

Autumn

Winter

Regards
Derek
Tuesday, 15 June 2010
WANG: PART 6
Ok, we are nearly there so hang on in there.
Load up RailWorks and Start the game.
Click on Routes, then New Routes.
Choose a template, for now just pick Default, (but the choice is yours) Click Create and give your Route a name, I called mine Bishop. Click ok and an empty route will load up with the default textures.
Close RailWorks.
Navigate to your Route folder. (something like: C:\Program Files (x86)\Steam\steamapps\common\railworks\Content\Routes )
Organise the folder by date, your new route will be at the top, I rename my route folders so I know which one is which. I added BISH in the second set of digits.
Inside that folder is a RouteProperties.xml
We are going to edit this file using Notepadd++ and reference our new terrain xml.
PLease note the correct way to do this is to set up your own Route template that is discussed on the WIKI
Ok, now that I am breaking all my own rules, please Note... Take care editing any xml in Notepadd++
1. Open the RouteProperties.xml in a text editor such as Notepad++
2. Browse to the following. I have highlighted the important bits in RED:

3. Change the parts highlighted in red to match the location (including product and provider) of the exported texturing file you have created.
4. Save the RouteProperties.xml then run RailWorks and load the route. Your new terrain textures should now be available.
5. If your new texturing file is in a provider/product which is not preloaded, you should tick it in the object set filters for that route so that it is preloaded next time.


Load up RailWorks and Start the game.
Click on Routes, then New Routes.
Choose a template, for now just pick Default, (but the choice is yours) Click Create and give your Route a name, I called mine Bishop. Click ok and an empty route will load up with the default textures.
Close RailWorks.
Navigate to your Route folder. (something like: C:\Program Files (x86)\Steam\steamapps\common\railworks\Content\Routes )
Organise the folder by date, your new route will be at the top, I rename my route folders so I know which one is which. I added BISH in the second set of digits.
Inside that folder is a RouteProperties.xml
We are going to edit this file using Notepadd++ and reference our new terrain xml.
PLease note the correct way to do this is to set up your own Route template that is discussed on the WIKI
Ok, now that I am breaking all my own rules, please Note... Take care editing any xml in Notepadd++
1. Open the RouteProperties.xml in a text editor such as Notepad++
2. Browse to the following. I have highlighted the important bits in RED:
(Click on image below for higher res image)

3. Change the parts highlighted in red to match the location (including product and provider) of the exported texturing file you have created.
4. Save the RouteProperties.xml then run RailWorks and load the route. Your new terrain textures should now be available.
5. If your new texturing file is in a provider/product which is not preloaded, you should tick it in the object set filters for that route so that it is preloaded next time.
So this is where the fun started.
With Ben's RW Ace tool it worked great but I had an issue with the last mip. I have emailed Ben to see if he can improve the situation. Will keep users posted.

So I reverted back to the trusty ToAce by Paul Guasden, only to find out the problems of using the 64 bit system. I'm sure there is a work-a-round for this but at midnight and no tech help I just left it alone.
Time to boot up the trusty xp machine to convert the tga files.
And here is the result. Not the smooth ending I wanted but got there thanks to Ben and Paul's tools.
Note that no spraying/painting was used on the below image, all of that was because of the values we put in the xml.

By going through this process I certainly have felt users pain if they do not have photoshop.
All noted for sure.
So thats the end of Wang, next up procedural grass.
regards
Derek
WANG: PART 5
Before we start the next chapter it is wise to make a further 3 sets of textures.
1 - Grass. This will be your mid ground cover and the texture you see when you first load up the route. (assuming you are just above sea level, these values can be changed and will be explained)
2 - Sand. This I am using for the ground below sea level.
3 - Dry grass. This I am using for my upper ground.
4 - Small stones. (made in part 2) This we are using as our Rock gradient.
Adam explained it when we made Phorum a few months back, for reference Here is his post.
So, lets make our new terrain xml.
In your source folder, located somewhere like this (depending on where you have the game saved)
C:\Program Files (x86)\Steam\steamapps\common\railworks\Source
Make a Provider/Product folder set up so it looks like this:
C:\Program Files (x86)\Steam\steamapps\common\railworks\Source\RSderek\Bishop\Environment\Terrain
RSderek the provider and Bishop is the poduct.
Within that Bishop Folder make an Environment folder then a Terrain Folder.
Within that Terrain folder you can make other folders to seperate out your various textures so that they are easy to find, Grass, Rock, sand, urban, etc etc.
To begin with I made a folder called Core. Here I copied the 4 main textures needed to set up the route. (You don't need to set up 4, you can ref the same texture for all sections but a bit pointless as you would not see anything... :) )
Now the fun begins. Load up RWs and start the Blueprint editor.
Navigate to your Terrain folder and right click the folder, then select new Blueprint.
Scroll down the list to Terrain Texture blueprint, select it then click ok.
Rename the xml, I named mine Terrainset.
Below is an example of my basic parameters, set your something like it, looking back to Adams post for more refference.
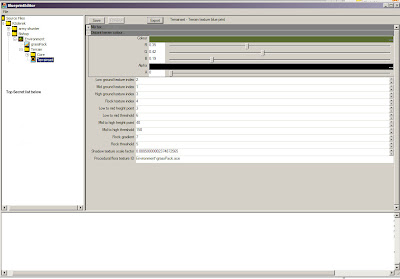
For now leave the Procedural flora texture ID blank. (We (you) have not made that yet, this will be covered in a 'Wang epilog' post)
Click Save
Ok, Now to add your Textures to the xml.
Click on the little plus symbol at the top next to the work Mix tex.
This expands the texture area. Right click the texture in the core folder and select copy file name.
In the base texture name slot press Cntrl V to paste the string.
IMPORTANT: remember to remove the _A (it is not needed here)
Fill in the rest of the details like the image below.
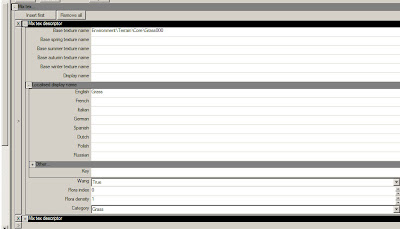
Click Save.
Click on the little > icon, this will open up another texture slot, it will need to be filled in as the first. (Make sure you match the correct texture to the ID number given in the low/mid/high texture index.)
Note also that this is the order that the textures will appear in your texture list in game.
When all done click save, then export.
Next in Part 6 Referencing your terrain xml to in your new route.
1 - Grass. This will be your mid ground cover and the texture you see when you first load up the route. (assuming you are just above sea level, these values can be changed and will be explained)
2 - Sand. This I am using for the ground below sea level.
3 - Dry grass. This I am using for my upper ground.
4 - Small stones. (made in part 2) This we are using as our Rock gradient.
Adam explained it when we made Phorum a few months back, for reference Here is his post.
So, lets make our new terrain xml.
In your source folder, located somewhere like this (depending on where you have the game saved)
C:\Program Files (x86)\Steam\steamapps\common\railworks\Source
Make a Provider/Product folder set up so it looks like this:
C:\Program Files (x86)\Steam\steamapps\common\railworks\Source\RSderek\Bishop\Environment\Terrain
RSderek the provider and Bishop is the poduct.
Within that Bishop Folder make an Environment folder then a Terrain Folder.
Within that Terrain folder you can make other folders to seperate out your various textures so that they are easy to find, Grass, Rock, sand, urban, etc etc.
To begin with I made a folder called Core. Here I copied the 4 main textures needed to set up the route. (You don't need to set up 4, you can ref the same texture for all sections but a bit pointless as you would not see anything... :) )
Now the fun begins. Load up RWs and start the Blueprint editor.
Navigate to your Terrain folder and right click the folder, then select new Blueprint.
Scroll down the list to Terrain Texture blueprint, select it then click ok.
Rename the xml, I named mine Terrainset.
Below is an example of my basic parameters, set your something like it, looking back to Adams post for more refference.

For now leave the Procedural flora texture ID blank. (We (you) have not made that yet, this will be covered in a 'Wang epilog' post)
Click Save
Ok, Now to add your Textures to the xml.
Click on the little plus symbol at the top next to the work Mix tex.
This expands the texture area. Right click the texture in the core folder and select copy file name.
In the base texture name slot press Cntrl V to paste the string.
IMPORTANT: remember to remove the _A (it is not needed here)
Fill in the rest of the details like the image below.

Click Save.
Click on the little > icon, this will open up another texture slot, it will need to be filled in as the first. (Make sure you match the correct texture to the ID number given in the low/mid/high texture index.)
Note also that this is the order that the textures will appear in your texture list in game.
When all done click save, then export.
Next in Part 6 Referencing your terrain xml to in your new route.
Monday, 14 June 2010
WANG: PART 4
Just a mini update this morning,
To make an Ace file without photoshop or ACDsee you will need Ben Laws excellent RWAce Tool located on our Website: http://www.railsimulator.com/en/support. under the Railworks art plugins heading.
Once downloaded, follow the install instructions and run the RWAceTool.exe
Click on the single image conversion first, browse for your textures and pick the first _A and click open. Then click view.
Here you can look at RGB texture or the alpha. Close the image down and click back.
Click on the Multiple image conversion.
Click the Add button on the right, then select your 8 textures, then open.
Click the Next button, then the Start button. The process will take a second. Once done click the finish button.
And there you have it your set of Ace files.
Next in Part 5, How to set up your new terrain xml.
Then, in the final Part (6) we will cover how to refference your new terrain xml in your route.
d
To make an Ace file without photoshop or ACDsee you will need Ben Laws excellent RWAce Tool located on our Website: http://www.railsimulator.com/en/support. under the Railworks art plugins heading.
Once downloaded, follow the install instructions and run the RWAceTool.exe
Click on the single image conversion first, browse for your textures and pick the first _A and click open. Then click view.
Here you can look at RGB texture or the alpha. Close the image down and click back.
Click on the Multiple image conversion.
Click the Add button on the right, then select your 8 textures, then open.
Click the Next button, then the Start button. The process will take a second. Once done click the finish button.
And there you have it your set of Ace files.
Next in Part 5, How to set up your new terrain xml.
Then, in the final Part (6) we will cover how to refference your new terrain xml in your route.
d
Subscribe to:
Posts (Atom)