Friday, 29 January 2010

Shaders and kuju materials - AddATex

AddATex is the material we use for additive glows. Example uses include glows around bulbs, glows around headlights and glows on surfaces (from streetlights).

As this effect is additive, these effects are visible both day or night, but are more effective and more visible at night. For our example, we'll consider a streetlight.


Here you can see the streetlight asset with a night time node. This node will simply switch on (become visible) at night time.

If you examine the 3DSMax wireframe view, you can see that there are two glows contained in this asset, one upper glow centred around the bulb and one lower glow on the floor itself. Both of these glows use the AddATex material but with slightly differing properties.

The bulb glow needs to always face the camera, so that it gives the effect of a simple lens flare. This will need to have the 'VIEW FACING' flag ticked in the material.

The floor glow needs to be static and remain in position, and therefore should use the default 'NOT VIEWER FACING' flag.

Our two AddATex materials are detailed below. The material on the left is for the bulb glow and the material on the right is for the floor glow. Notice the viewer facing flags in the materials.

Also note that as these materials use alpha, the Z-Buffer mode is set to 'TEST ONLY' in both. This ensures the materials render correctly.


Example textures :

Thursday, 28 January 2010

Shaders and kuju materials - SubtractATexDiff

SubtrackATexDiff is the material we use for soft shadows under rolling stock.
This object should be exported in the same 3DSmax file as the asset you want it under. (However you could also set it up as child object also)


First of all I made a box roughly the size of the wagon or asset you want the shadow to sit under.
I deleted all the polygons except the top one and then reset x form/and position and transform on pivot. I then placed this at 0/0/0 in the world. Remember that 0 height in Max is the top of the rails in RailWorks for rolling stock.
So with that in mind I dropped the shadow object down a few centimetres so that the shadow would be above the sleepers but below the rail height.

I have my object a name 1_0300_softshade, so after 300M the shadow would not be drawn.


I selected the Kuju Material SubtractATexDiff, set the alpha to Test Only (1) then selected my texture.

Below is an example of a 24Bit shadow texture. (no alpha channel is needed)
The darker the grey the less it shadows, black is invisible and white is solid black shadow (I know it seems wrong)


Export your 3DSMax scene and view the effects in the Asset Editor.


Saturday, 16 January 2010

Shaders and kuju materials - Train_Light_map _with_Diffuse. Fx

This kuju material is the most common one used in RailWorks.
However, it is a little more complicated than most as it needs the user to create a second mapping channel and a light map texture.
To help discuss this material I will be using a simple wooden shed object to help illustrate the methods used.
Above is an image of a texdiff material, the object looks flat and unlit.
Above is a Train Light Map With Diffuse, you can see the shadows make a huge difference.
Before I start, I just want to point out that there is no right or wrong way to go about getting the best results, this is just the way I do it.
Before I make a 3D model I tend to make most of the texture first. The reason I do this is that I constrain myself to what is important. Laying the ground rules before you start helps focus to what’s important.
While making the texture you also want to give some consideration to winter textures, if a material is used on a roof and you want to do a winter version with snow on then you best not use that section of the texture for a wall surface.

Save this texture in the correct folder structure something like this:
C:\Program Files (x86)\Steam\steamapps\common\railworks\Source\RSderek\WearValleyRailway\Scenery\Misc\Textures The Max/IGS and XML files will all be saved in the Misc folder, and all textures saved in the texture folder.
Ok, once you have made your object, select Polygon option in the modify panel and then select all the faces in the object and assign ID1 (1)
Also make sure all the faces in your object have a smoothing group. This can be done by pressing auto smooth in the same panel (2)

Save max.
Open up the Material Editor, this can be done by pressing ‘M’ or selecting the icon from the top tools bar.
In the Editor, click the Standard button, the select Kuju Material.
In the Shader Configuration section click the black triangle next to the TexDiff option. This will open out the list of Kuju Materials. Move the slider down and select ‘TrainLightMapWithDiffuse.fx’

In Slot 1 click ‘None’ , then select bitmap at the top of the list in the new window, click ok and then find your texture in the explorer window, once selected the windows will be closed and you will be back in the material editor.

Now click on show standard map in viewport button (the little isometric blue and white chequered square)

You have your model, material and texture, now you need to map the texture to the object.

There are many ways to unwrap, and I use different options for different , For this simple object I am going to flatten unwrap then move the mapping coordinates around till I have each face mapped as I want it. (Indepth mapping of objects will be covered in a different post, however there are many tutorials for doing this on the net)
Select the polygon selection button in the modifier list, select all the polygons in your object then click the little black triangle next to the words Modifier list, this shows all the modifiers you can then apply to your object. Scroll down and select Unwrap UVW, then click 'edit' in this new panel.
This brings up a new mapping window.
It will be a mass of green and white lines depending on how you have modelled your object.
But be cool, we will make order from this chaos.
In the bottom tool bar select Face-Sub object mode',
Draw a selection box around all your messy lines in the window.( you may have to zoom out in the window to select them all)
In the top tool bar in the mapping window click the ‘Mapping’ button then select the flatten mapping. Another smaller window opens up. Leave the Face angle threshold at 45, however change the spacing to 0.002. (this packs the coordinates closer together) Then click OK.

You now have all your polygons mapped out in a square.
This is great but now you want to reuse sections of your texture a number of times, I moved my coordinates around to layer up the mapping on certain sections of my model. (Indepth mapping of objects will be covered in a different post, however there are many tutorials for doing this on the net)
This is how my final mapping coordinates look against my texture:

Close the mapping window and then right click on the Unwrap UVW (It should be highlighted in yellow) and select ‘collapse all’ You can leave the UVW in the stack if you wish but it serves no real purpose in this tutorial, remember to collapse the stack before export.
Save max.
OK, Diffuse side done now for the Light map.
Once again select the polygon selection button in the modifier list, click the little black triangle next to the words Modifier list and scroll down to select Unwrap UVW.
(Depending on your version of max the process is slightly different. I am using Max2009)
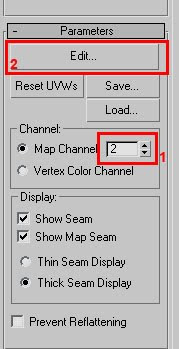

Change the map channel to 2. (1) then click Edit (2) This brings up a new mapping window as before.
In the bottom tool bar select Face-Sub object mode, draw a selection box around all your messy lines in the window.( you may have to zoom out in the window to select them all)
In the top tool bar in the mapping window click the ‘Mapping’ button then select the flatten mapping. Another smaller window opens up. Leave the Face angle threshold at 45, however change the spacing to 0.002. (This packs the coordinates closer together) Then click OK. You will now have all your faces tightly mapped into a square. You can fine tune these mapping coordinates if you wish but I seldom do, but I will if I do not feel I am getting the best out of my space. Before doing this I suggest lots of mapping practise.

Close the mapping window and then right click on the Unwrap UVW (It should be highlighted in yellow) and select ‘collapse all’

OK, we now have an object with 2 mapping channels awaiting the second texture.
Save max.

We now need a light map, this is how we make it.

As you have just saved the max file we now need to make the lighting setup, Save the same current scene under a different name, something like ‘Shed_light.max’

Select your object, in this case I select my shed and I assign a default material (1)
Select your object then assign the material (2)
Untick the yellow lock from diffuse and ambient (3)
Darken the Ambient colour (4)
All other values leave alone.
(These values are not hard rules and I suggest experimenting with different values to see the effects.)

In the top view create a box 100Mx100Mx-20M make sure this box is centred under your object. This we will use as our ground plan so that the light will not shine up through the floor. Assign the same default texture to this box. (also make sure the box is flush to the base of your object)
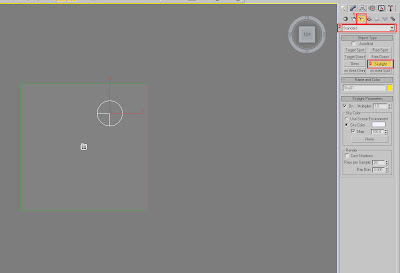
In the modifier panel click on the light icon (1), select Standard (2) and select sky light (3)
Then click on the screen, this will create a light. In the right hand view port make sure the light is above the floor plane and your object. (It is not important to be exact about placing your light except to make sure it is not inside an object)

Select the light and in the modifier panel make sure the skylight is white (click the colour swatch and slide the value to white)
Press F10 to open up the Render Setup window. In the advanced Lighting set up select Light Tracer.
These values can all be changed and experimented with. To begin with use the setting from the image below.

At this point you can set up a camera and render as usual to have a peek at what the object looks like, if you are not happy with the results change the values in the Advanced set up.
Select your object to render.
Once happy, Press 0 (Zero) this will bring up the Render to texture window.
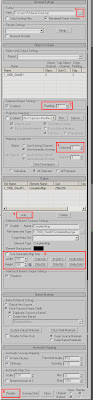

Click the select path where you want to save the texture (1)
Scroll down and set 3 in your padding (2) this bleeds around the coordinates to reduce mip issues
Mapping Channel set to 2 (3)
Scroll down and click the ‘Add’ button Select Complete map (4)
Scroll down to select your map size, for this small shed I will choose 256/256, however 128/128 would be fine, (for larger objects choose a larger map size). (5)
Scroll down and click Render and then OK. (6)
It may take a little while depending on the number of polys in your object.

Once done, find your texture on your desk top and save and convert it into a .ace in the same folder as your diffuse texture. (Choose a suitable name, I normally save the file as the same as the diffuse but with and _SM at the end, it helps me keep track)
Save this max file then reopen your original max file.

Open up the Material Editor and in the kuju material select slot 2, click ‘None’ , then select bitmap at the top of the list in the new window, click ok and then find your shadow map texture in the explorer window, once selected the windows will be closed and you will be back in the material editor.
Close the Material Editor, make sure your object is named correctly and export as an IGS as usual.
This is a fairly long tutorial and I may have missed a step or two, please leave comments or requests for me to change.
Thanks
d

Tuesday, 3 November 2009

Shaders and kuju materials - WaterCubemap.fx

In Railworks there are a number of ways of creating water assets in your route.

(1) Rivers - Here a river loft is recommended. This asset would use the WaterCubeMap.fx

(2) Lakes and Seas - The in-game (editor mode) water decal is recommended as it is the most efficient way to create a large expanse of water.

(3) Scenery - Sometimes a very small localised water effect is required on a scenery asset that is irregular in shape. In this case, the WaterScenery.fx shader can be used.

Using the WaterScenery.fx shader, the author can create a scenery asset and assign the WaterScenery.fx to any polygon. Therefore the shape of the water surface is under the control of the author. This asset can be exported as usual via a the IGS format and be referenced in a 'Scenery Blueprint'.

Example Use
Water troughs, swimming pools, circular ponds, open water towers etc.
Points of Interest
This is a vertex shader (meaning the positions of the vertices of the surface are physically moved) is therefore expensive to render. It is therefore recommended to keep its use down to a minimum.

Notice that the surface of the water shown below is no longer flat as seen in the other water shaders.


As can be seen below, the shader is a triple pass shader with 3 texture slots. All texture slots MUST contain a reference to a texture. In slot 1, we specify the normal map texture, along with the five UV arguments and specular value. In both slots 2 and 3 we specify the texture for the water surface.


The following UV arguments should be setup for slot 1 of the shader.

UV argument 1 : Specular component (values between 0 and 64)
UV argument 2 : 'Wobble' factor (values between 0 and 1)
UV argument 3 : Movement speed (0.02 is a good value)
UV argument 4 : Oscillation height (0.02 is a good value)
UV argument 5 : Oscillation scale (6 is a good value)

Below are example textures showing the alpha channels where applicable.

Shaders and kuju materials - TrainGlass.fx

The TrainGlass.fx shader in RailWorks should be used whenever a translucent glass material is required. e.g. Windows on rolling stock.

Using the glass shader the author can control the following properties:
(a)Texture - Whats on the glass, colour, scratches etc
(b)Translucency - How see-through the glass is
(c)Specular - The size of the 'shiny' highlight phong
(d)Environment Map - The intensity of the environment map (the faked reflection) in both day and night lighting conditions.

Example Use:
Windows on Rolling Stock
Point of Interest:
Only a single texture needs to be created by the author, even though there are two texture slots in this material. Both texture slots MUST contain a texture reference. The same texture can be referenced (or pointed to) in both texture slots. This second texture slot simply exists to allow the game code to carry out a second environment pass (fake reflection map) in the game.

Here we have the TrainGlass.fx shader applied to 3 assets (A,B and C), all using different parameters.

TrainGlass.fx shader viewed in the daytime.


TrainGlass.fx shader viewed in the nighttime.


Here we have the 3 materials used for the assets A, B and C. All use the same shader (TrainGlass.fx) but use different parameters. The parameters are highlighted below.


The important parameters are the UV arguments (for Slot 1 only), and the Specular Power.

UV argument 1 : This specifies the 'tightness' of the phong highlight. Keep this value somewhere between 0-64 with 64 being the 'tightest'.

UV argument 2 : This specifies the intensity of the reflection (day-time)

UV argument 3 : This specifies the intensity of the reflection (night-time).

Specular Power : This specifies how brightness (or intensity) of the phong highlight. Keep this between 0-8 with 8 being brightest.

Example texture (used for the examples above) showing RGB and intensity of alpha channel.

Saturday, 24 October 2009

Shaders and kuju materials - Part 2 - Texdiff

Good old tex diff, the default shader you should use the first time you try to display anything in game.
Why? Because it needs no extra work in setting up, it's the quickest shader to use to find out if something is wrong with your model or texture.

Description:
This shader is lit by diffuse lighting.
Example use:
Small clutter objects.
Point of Interest:
This is a 2 sided material. however the polygons only get lit correctly from one side in game.
Also, be careful when putting 2 surfaces close together when using this material, as the material is 2 sided and even though poly normals are facing away from each other you will get z fighting which will cause the surfaces to flicker as they fight to be displayed.

There are many legacy buttons and values in all of the Kuju shaders many of them do not function in RWs, even the team have not explored all of the options!


1 - Mip LOD Bias.
This is used to push the mipping further out or bring it in.
Normally we leave this at 0.
However if you want to push the mipping out on textures (For dials in cabs,logos/text on the side of trains etc) a minus value needs to be used. Thi means the texture stays sharper for longer the further you pull away. -2 is what the team use for mnost dials in cabs.

2 - Transparency.
NONE or TRANS, speaks for itself. If your texture is 24 bit then leave this on NONE as default.
Below is an example texture and it's alpha channel.


Texture - Diffuse texture


Texture - Alpha channel

Texdiff - without transparency


Texdiff - with transparency

If you have an alpha channel in your texture and it is saved as 32 bit and you want the alpha to be used then Change this to TRANS.
(Black is transparent and white is solid in the alpha channel)

3 - Lighting Material
These settings don't get used much by the team but you can change the Diffuse Colour, Ambient Colour and Emissive Colour.

This is useful if you make a greyscale texture and colourise it by one of these methods.
For Example, create 1 car texture and create many coloured versions by this method. A great way to keep texture count down.

Specular and Specular power are not used in this material.

Tuesday, 20 October 2009

Shaders and kuju materials - Part 1

To get assets into RailWorks they must have a kuju material assigned, without them you will never get anything to appear in RailWorks.
To get the materials to show up in 3DS max you need the kuju plugins, these are available from the RailSimulator website:
(I don't use Canvas, but anyone willing to do a canvas version of posts please contact me)
Follow the read me inside the downloadable zip to install the plugins for 3dsMax and Photoshop.
Once the plugins are installed start Max.
Enter the material editor and click on the Standard button (1)


In the list click on the Kuju Material (2) This then put the kuju list of materials in place of the standard materials.


Click on the arrow next to the default RWs material TexDiff (3)
The full list of kuju materials show.
RailWorks/Simulator only uses a few of these materials.


End of Part 1